Sunday, May 4, 2014

Graduation Card in a Box

It's that time of the year again!  Everyone is talking about graduation.  When I saw the new cap and diploma dies from MFT, I thought they would work great in a graduation box card.  I really liked how it turned out.  I used girlie Gator colors and added some streamers and stars and it looks like quite a party!  


I used an MFT border stamp cut into pieces for the streamers!  Here's a side view….


Supplies Used:
Stamps: My Favorite Things -  LLD Happy Graduation
Cardstock:  Stampin' Up Brilliant Blue, Only Orange, Blue & white floral decorative paper, Gator paper and Cougar Opaque white
Inks: Versafine - Black
Dies :  My Favorite Things LLD Graduation Accents & Looped Border Dies Spellbinders classic Oval & Scalloped Oval Dies 
Miscellaneous: Star Punch, acetate

Thanks for stopping by today!

Janet


Monday, April 28, 2014

Making Soup

I had to come up with a card for a project day with friends and since I've been wanting to try making a recessed window card I decided to do that.  I found a tutorial on Splitcoaststampers  and played around with it until I made it work and felt confident enough to teach it to a group. Thank goodness for the video that Splitcoast provided, it made figuring the card out so much easier!  You can view the tutorial here.  Because of the construction, I think this card would have to be hand cancelled so it will take a little extra postage to mail, but it's so cute it's worth it.  Even though the recessed window is only a quarter inch deep, I found it to have a lot of space for layering.  It has potential for all different types of scenes.  I'll be making more of these :)  I kept this one on the simple side because of limited time for my project.  I made 2 different cards to give my friends a couple of options.  


Because of the construction, you have to decorate the left inside of the card…


Here are some close ups.   Can you see how much space there is for layering?  I used two pieces of foam tape behind the chef and one more to pop the pot out.  That means there could be at least 3 layers within the window!  I added a MFT banner made out of Graphics 45 paper to add a little embellishment to the frame.


Here's the other card.  The chef stamps are from Inky Antics.  They are still available for purchase but I couldn't get a direct link from the website.  If you do a search for "clear stamps" then go to page 22 you should see the set.  Here is the number and name…10983LC, Stovetop Cooking Chefs Clear Set.  I also used an MFT border die to embellish this window


I used Prismacolor pencils and Gamsol mineral spirits to color all of the images and used Tim Holtz Distress Ink (Scattered Straw) to edge around all the white pieces.  Hoping this inspires you to do some stamping!  

Thanks for stopping by,
Janet

Groovy

I cased this card made by Taylor VanBruggen of Taylored Expressions.  I just loved the paper and the bright colors!  My husband had a VW bug when we were dating so they have a special place in my heart!  I usually make 4-6 of the same card when I get busy stamping.   I only have one of these cards left and I'm sending it tomorrow, so I figured I better take a pic and post it before putting it in the mail.  Kind of takes you back in time…doesn't it?   


Thanks for visiting, have a good week :)
Janet

Uptown Girl - Posh Has a Present

I just love the Uptown Girl collection by Stamping Bella!  This stamp was perfect to make a birthday cards for one of my best friends and for my niece!   Here's a link if you need to have this sweet stamp!  It's called Posh Has a Present.  


I used Copics to color her and added a cityscape die cut from My Favorite Things at the bottom!

Thanks for visiting :)
Janet

Sunday, March 16, 2014

Hi Friend

Tried my hand at a Mojo Monday card sketch today.  It took me a long while to try sketches for inspiration, but once I tried them I was hooked!  Here's the card…


I used Ellzybells stamps.  I really miss that company, their stamps are so cute.  
Thanks for visiting!

Janet


Thursday, March 13, 2014

Card in a Box Bouquet

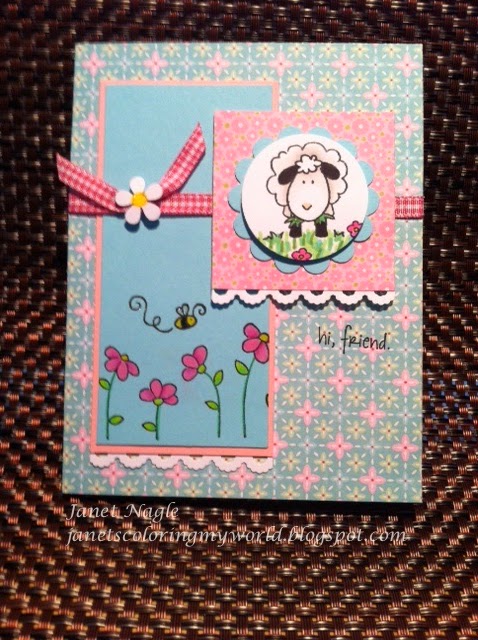
I've seen so many of the cards in a box on Pinterest lately that I was itching to try one.  I looked at lots of tutorials and found that there were quite a few different measurements that I could use. I made a sample that would fit in an A2 envelope but it was too small because I wanted to use Stampin' Up's Flower Shop stamps.  I found another tutorial but the measurements were in centimeters and I couldn't figure out the conversion, so I took a piece of 8-1/2 x 11 card stock and figured it out!  I'll put the measurements I used at the bottom of this post in case you are having the same problem that I had.  Here is how my card came out!


And here is a side view.  There are lots of tutorials for assembling this kind of card on line.  Just do a search and you will find one.


The really amazing thing about this kind of card is that it folds flat and can go into the mail!  It has real WOW potential!  I know I will be making lots more of these!


Here are the measurements I used

Fits in envelope that is 5-3/4" x 8-3/4"

Cut card stock 10-1/2" x 8"

With 10-1/2" side up at top of score board….Score at 2-1/2, 5, 7-1/2 and 10

Turn so 8" side is up at top of score board….Score at 4

Cut extra piece of same color 3-1/2" x 3-1/2"  ….Score this piece at 1/2 and 3 and cut in half (1-3/4)


Measurements for mats

For back of box 
Large mat is 7-3/4" x 2-1/4" ……smaller mat 7-1/2" x 2"

For flaps and bottom

Large mat is 3-3/4" x 2-1/4"…..  smaller mat is 3-1/2" x 2"

Supplies Used:
Stamps: Stampin' Up Flower Shop
Cardstock: Stampin' Up Whisper White, Soft Suede, Old Olive, Pretty in Pink, Taken with Teal, DSP 
Inks: Stampin' Up Cool Caribbean, Pretty in Pink, So Saffron, Taken with Teal
Dies :  My Favorite Things Royal Leaves

Miscellaneous: Stampin' Up Pansy Punch, 1-1/4 Circle Punch, 1-3/8 Circle Punch, Scalloped Circle Punch,  Art Institute Glitter

Sunday, March 2, 2014

Rose Cupcakes

When I was up north visiting my son, I went to my favorite stamp store, Bella Arts in Johnston, RI and I found the sweetest cupcake ever…and it didn't have any calories at all!!  I was thrilled to find that they had some of the paper mache cupcakes left, so I scooped them up and brought them home.  I used MFT's large rose die to cut the roses and got lots of practice rolling them, and I'm in love with the finished product!  I'm going to make a bunch because they will come in handy when I need a little gift for someone! 


I can't decide which one I like best.  Here's a close-up pic of the pink one…


and of the yellow one…I added some clear Stickles to this one...


I want to make a purple one and a blue one and a light pink one!  They are so adorable when they are finished :)  I found the paper mache cupcakes at Joanne's on line so if you NEED to make one you can get them there!

Supplies Used:
Cardstock: Stampin' Up for roses. 12 x 12 decorative paper for bottom
Dies : My Favorite Things large rose die and leaf die
Miscellaneous: hot glue gun & sticks, Martha Stewart score board, tweezers, clear Stickles

Thanks for visiting, 
Janet