This adorable little Halloween card was inspired by one I saw on Kristina Werner's blog. The stamps are from a Lawn Fawn set called, Monster Mash. I thought it would be really quick and easy but I couldn't get the monsters as bright as I wanted them. I tried coloring with Distress inks like Kristina did but I didn't have the right colors. Next I tried Tombo markers and didn't like that. Then I tried Copics...didn't like that either because the purples weren't right. I remembered that reinkers are very vibrant when used as watercolor paint so I tried that and was finally happy with the results!
Painting with reinkers is easy and fun. Stamp your image onto watercolor paper (I used Canson Aquarelle that I got at Micheals). Then use a paint brush and water to paint. You can blend colors to make new ones, you can add water to soften the color and make it look paler and you can layer colors because they are transparent. This makes blending pretty easy to do.
Here's a pic of the inside of the card. Isn't the little baby one-eyed monster cute?
Thanks for looking :)
Janet
Supplies Used
Stamps: Lawn Fawn: Monster Mash
Cardstock: black linen, Canson Aquarelle watercolor paper, purple & green glitter paper, purple swirl paper from a Halloween paper pack
Reinkers: Tsukineko: Lemon Yellow, Poppy Red, Orange, Olive Green, Peony, Chartreuse; Vivid: Purple; Stampin' Up: River Rock
Miscellaneous: Score Tape, foam tape
Thursday, October 16, 2014
Tuesday, October 14, 2014
Life is Good
I am still loving my new Lawn Fawn stamps and dies! There is something about them that makes me want to use really bright colors and when I do, the completed cards make me smile. I hope the people who receive them have the same reaction. I used reinkers to watercolor this card because they give me the brightest colors ever. I think they might even be brighter than my Copics and they are really easy to blend!
Here's a close up of the little crab in the hammock. I popped up the palm trees, hammock and crab to give the card dimension.
Thanks for taking the time to visit. Hope you are having a wonderful week!
Janet
Supplies used:
Cardstock: My Favorite Things: Kraft, Stampin' Up: Pool Party, Canson Aquarelle
Watercolor paper, Core-dinations: Yellow variegated stripe
Stamps: Lawn Fawn: Life is Good, My Favorite Things: Dots Background
Ink pads: Versafine: black, Distress Ink: Frayed Burlap
Reinkers: Tsukineko: Lemon Yellow, Tangerine, Poppy Red, Chartreuse, Olive Green
Stampin' Up: Sahara Sand, So Saffron
Vivid: Turquoise
Dies: Lawn Fawn: Life is Good
Miscellaneous: Twine, foam tape, Ranger ink tool, paintbrush,
Labels:
Lawn Fawn,
Life is Good,
MFT,
My Favorite Things,
reinkers,
summer
Saturday, October 11, 2014
Pink and Lacy
I had some friends over to make cards today. I did three projects. Here is the first one. I used a cute retired set from Stampin' Up called Sweet Summer. I think pink and white lace are perfect together so decided to use both on my card. I didn't have any designer paper that I liked with the flower stamp I used so I made my own using a scroll background stamp from Hero Arts. It needed some pink to make it match the flowers so I added dots with a single dot stamp from Printworks. I can't believe how often I use that little stamp but I seem to be grabbing in all the time!
Here's a close up of the flowers. I used Copics to color them. I didn't use traditional blending groups, but the colors blended very well and made coloring easy. I used Spellbinders dies to make the pink frame around the flowers.
I kept the pink and lace theme going to the inside of the card.
Thanks for stopping by!
Janet
Supplies Used:
Cardstock: Stampin' Up: Pink Passion & Mellow Moss, Cougar Opaque White
Stamps: Stampin' Up Sweet Summer, Hero Arts Florentine Scroll Background, Printworks Single Dot
Inks: Momento Tuxedo Black, Distress Inks: Bundled Sage, Worn Lipstick, Picked Raspberry
Copics: Flowers: R29, RV04 & RV32
Leaves: YG67, G82 & YG11
Dies: Spellbinders Labels 17
Miscellaneous: Stampin' Up Pearls, white & silver twine, foam tape
Here's a close up of the flowers. I used Copics to color them. I didn't use traditional blending groups, but the colors blended very well and made coloring easy. I used Spellbinders dies to make the pink frame around the flowers.
I kept the pink and lace theme going to the inside of the card.
Thanks for stopping by!
Janet
Supplies Used:
Cardstock: Stampin' Up: Pink Passion & Mellow Moss, Cougar Opaque White
Stamps: Stampin' Up Sweet Summer, Hero Arts Florentine Scroll Background, Printworks Single Dot
Inks: Momento Tuxedo Black, Distress Inks: Bundled Sage, Worn Lipstick, Picked Raspberry
Copics: Flowers: R29, RV04 & RV32
Leaves: YG67, G82 & YG11
Dies: Spellbinders Labels 17
Miscellaneous: Stampin' Up Pearls, white & silver twine, foam tape
Tuesday, October 7, 2014
Birdhouse Buddies
I recently got my first order of stamps from Purple Onion and I adore them! Stacey Yacula draws the cutest little animals. You can't help smiling when you look at them! The single flying bird on this card is called Robin and the two sitting on the branch are Star and Sky! Aren't they perfect with this little birdhouse from Marianne Designs? This was such a fun card to make :)
I stamped the birdhouse on watercolor paper, colored it and then used the die to cut it out. Then I stamped the branch onto white card stock and colored it.
Did you ever have one of those serendipitous moments when you find a new technique by chance? Well that happened to me with this card. I have been looking at Pan Pastels and finally bought a few. The Pthalo Blue Tint is wonderful for adding skies to stamped scenes so I rubbed some onto the background of this card. I thought there was an awful lot of plain space and wanted to zip it up a bit so I got a stencil, some ink and a sponge and started rubbing the ink onto the background over the Pthalo Blue Tint pastel. When I lifted the stencil the magic happened!!! The light purple ink was there but rubbing the sponge over the stencil removed some of the blue pastel so there were subtle white spots there too!!! I hadn't expected that and I got so excited that I kept moving the stencil and adding more...then I went and got a light blue ink and kept going. It was so much fun, I know I'll be trying this for a background again! It was really fun to lift the stencil and see what was underneath! If you try it, I'd love to know how it works out for you and to see what kind of a look you get so please send me a link!
Next I sprayed the background with Krylon clear matte spray to prevent the pastels from rubbing off. Then I hung the birdhouse from the branch using foam tape to 3-D it. Next I stamped and colored Robin, Star and Sky using Copic markers and attached them with foam tape. Look at Robin flying near the birdhouse...the sizes couldn't be more perfect together...right???!!!
Sorry the next picture is a little blurry. I thought it was better than this. I already mailed the card so I can't take a clearer picture. I still wanted to post a close up picture of Star and Sky...they are soooo cute!!
Here is the inside of my card. I'm still hooked on using coordinating washi tape to decorate the inside of my cards. Fast, simple and cute. Gotta love that!
Thanks for stopping by. Please post a comment and let me know what you think of my background technique. I like hearing from you!
Janet
Supplies Used
Cardstock: Canson Aquarelle watercolor paper, Cougar Opaque white, Stampin Up Almost Amethyst, Black Linen
Stamps: Purple Onion Robin, Sky and Star and Perch and Marianne Designs birdhouse/die, Stampin' Up Wonderful Words
Copics: C00, C01, C03, C05, C07, R29 I think E51 and E53 on the faces but put the markers away before listing them so I'm not 100% sure
Reinkers: (used to watercolor the birdhouse) Tsukineko Poppy Red, Peony & Chartreuse and Stampin Up Sahara Sand
Ink Pads: Momento Tuxedo Black, Stampin' Up Almost Amethyst and Bliss Blue
Miscellaneous: white twine, The Crafters Workshop stencil by Julie Balzer #361 Tiny Circles, Pan Pastels Pthalo Blue Tint, Krylon clear matte spray.
I stamped the birdhouse on watercolor paper, colored it and then used the die to cut it out. Then I stamped the branch onto white card stock and colored it.
Did you ever have one of those serendipitous moments when you find a new technique by chance? Well that happened to me with this card. I have been looking at Pan Pastels and finally bought a few. The Pthalo Blue Tint is wonderful for adding skies to stamped scenes so I rubbed some onto the background of this card. I thought there was an awful lot of plain space and wanted to zip it up a bit so I got a stencil, some ink and a sponge and started rubbing the ink onto the background over the Pthalo Blue Tint pastel. When I lifted the stencil the magic happened!!! The light purple ink was there but rubbing the sponge over the stencil removed some of the blue pastel so there were subtle white spots there too!!! I hadn't expected that and I got so excited that I kept moving the stencil and adding more...then I went and got a light blue ink and kept going. It was so much fun, I know I'll be trying this for a background again! It was really fun to lift the stencil and see what was underneath! If you try it, I'd love to know how it works out for you and to see what kind of a look you get so please send me a link!
Next I sprayed the background with Krylon clear matte spray to prevent the pastels from rubbing off. Then I hung the birdhouse from the branch using foam tape to 3-D it. Next I stamped and colored Robin, Star and Sky using Copic markers and attached them with foam tape. Look at Robin flying near the birdhouse...the sizes couldn't be more perfect together...right???!!!
Sorry the next picture is a little blurry. I thought it was better than this. I already mailed the card so I can't take a clearer picture. I still wanted to post a close up picture of Star and Sky...they are soooo cute!!
Here is the inside of my card. I'm still hooked on using coordinating washi tape to decorate the inside of my cards. Fast, simple and cute. Gotta love that!
Thanks for stopping by. Please post a comment and let me know what you think of my background technique. I like hearing from you!
Janet
Supplies Used
Cardstock: Canson Aquarelle watercolor paper, Cougar Opaque white, Stampin Up Almost Amethyst, Black Linen
Stamps: Purple Onion Robin, Sky and Star and Perch and Marianne Designs birdhouse/die, Stampin' Up Wonderful Words
Copics: C00, C01, C03, C05, C07, R29 I think E51 and E53 on the faces but put the markers away before listing them so I'm not 100% sure
Reinkers: (used to watercolor the birdhouse) Tsukineko Poppy Red, Peony & Chartreuse and Stampin Up Sahara Sand
Ink Pads: Momento Tuxedo Black, Stampin' Up Almost Amethyst and Bliss Blue
Miscellaneous: white twine, The Crafters Workshop stencil by Julie Balzer #361 Tiny Circles, Pan Pastels Pthalo Blue Tint, Krylon clear matte spray.
Labels:
Copics,
Marianne Designs,
Pan Pastels,
Purple Onion,
Stampin' Up,
Stencils,
Thank You
Sunday, September 28, 2014
Every Life Has a Story
This card was made for a swap. The theme was "heavy metal". I went crazy with everything silver and gold that I could think of! It was fun trying to figure out different textures to use on the metal. The dots and harlequin design on the background of the card were stamped with silver and gold Encore pigment ink
For this part I used a flat washer from Home Depot. I stamped a clock design onto it using Staz-On ink and attached it with a brad. The gold square was cut from a piece of a metal sheet that I got at Micheal's. I used a mold from Ten Second Studio to put the design on it.
I used a different mold to put the dots on the silver piece of metal and then used metal punch letters (purchased at a tool store) to put "HAVE FUN" on the little gold rectangle. You can see a portion of a gold frame in this picture. It is a frame stamp that I embossed with gold embossing powder
The metal pieces used here were lock washers (I think that's what they are called) that I found in Home Depot. I added a little key charm. Tombow Mono Metal glue held them on and worked through the mail.
The stamp is from Paperbag Studios. There was so much texture on the card that a flat image didn't look right. I stamped the image once onto watercolor paper and once with Encore silver ink on black paper. I colored the boy using Tombow markers on the watercolor paper. Then cut out the two sides of the image and mounted it onto the black one using foam tape to give it dimension. I did a search to see if the stamp is still available but couldn't find it. There was one for sale on Ebay though. The heavy metal theme would work well with any masculine collage image.
Supplies Used:
Cardstock: Black linen
Stamps: Paperbag Studios: Every Life has a Story, Dotted background stamp, Harlequin background stamp, clock stamp, Live Well stamp
Ink: Encore Pigment ink: gold and silver, Memories: black, Staz-On: black
Markers: Tombo markers: brown and skin colors, Pilot silver marker
Miscellaneous: Gold and silver metal crafting sheets, metal molds, gold and silver embossing powder, assorted washers, brads, key charm, metal punch letter set
Thanks for stopping by today. Have a creative, happy week :)
Janet
For this part I used a flat washer from Home Depot. I stamped a clock design onto it using Staz-On ink and attached it with a brad. The gold square was cut from a piece of a metal sheet that I got at Micheal's. I used a mold from Ten Second Studio to put the design on it.
I used a different mold to put the dots on the silver piece of metal and then used metal punch letters (purchased at a tool store) to put "HAVE FUN" on the little gold rectangle. You can see a portion of a gold frame in this picture. It is a frame stamp that I embossed with gold embossing powder
The metal pieces used here were lock washers (I think that's what they are called) that I found in Home Depot. I added a little key charm. Tombow Mono Metal glue held them on and worked through the mail.
The stamp is from Paperbag Studios. There was so much texture on the card that a flat image didn't look right. I stamped the image once onto watercolor paper and once with Encore silver ink on black paper. I colored the boy using Tombow markers on the watercolor paper. Then cut out the two sides of the image and mounted it onto the black one using foam tape to give it dimension. I did a search to see if the stamp is still available but couldn't find it. There was one for sale on Ebay though. The heavy metal theme would work well with any masculine collage image.
Supplies Used:
Cardstock: Black linen
Stamps: Paperbag Studios: Every Life has a Story, Dotted background stamp, Harlequin background stamp, clock stamp, Live Well stamp
Ink: Encore Pigment ink: gold and silver, Memories: black, Staz-On: black
Markers: Tombo markers: brown and skin colors, Pilot silver marker
Miscellaneous: Gold and silver metal crafting sheets, metal molds, gold and silver embossing powder, assorted washers, brads, key charm, metal punch letter set
Thanks for stopping by today. Have a creative, happy week :)
Janet
Labels:
collage,
ephemera,
masculine,
metal,
Paperbag Studios
Tuesday, September 16, 2014
Thanks for Volunteers
Today I made a bunch of thank you cards for some wonderful people who gave their time and energy to clean up the yards of some abandoned properties in our neighborhood. We all appreciate what they did and wanted to let them know so a friend and I got together and made this CAS thank you card for them!
The inside is simple too, I made the message on my computer and then added some color with washi tape!
I needed something to add a little interest to the "thank you" strip on the front of the card. I tried jewels and buttons but they just didn't give the look I wanted. I went through my stash and didn't have any black brads, either. Then I found some gold colored nail heads...and I wondered if I could color them with a sharpie and make them black. I tried and it worked like a charm!! They came out very black and shiny and were exactly what my card needed!!
Supplies used:
Stamps: Stampin' Up: Background Basics (retired)
Dies: Lawn Fawn Stitched Leaves
Other: Nail heads, black sharpie marker, washi tape, foam tape, Cuttlebug embossing folder
The inside is simple too, I made the message on my computer and then added some color with washi tape!
I needed something to add a little interest to the "thank you" strip on the front of the card. I tried jewels and buttons but they just didn't give the look I wanted. I went through my stash and didn't have any black brads, either. Then I found some gold colored nail heads...and I wondered if I could color them with a sharpie and make them black. I tried and it worked like a charm!! They came out very black and shiny and were exactly what my card needed!!
Supplies used:
Stamps: Stampin' Up: Background Basics (retired)
Dies: Lawn Fawn Stitched Leaves
Other: Nail heads, black sharpie marker, washi tape, foam tape, Cuttlebug embossing folder
Labels:
Background Basics,
Lawn Fawn,
Stampin' Up,
Stitched Leaves
Saturday, September 6, 2014
Thank Ewe
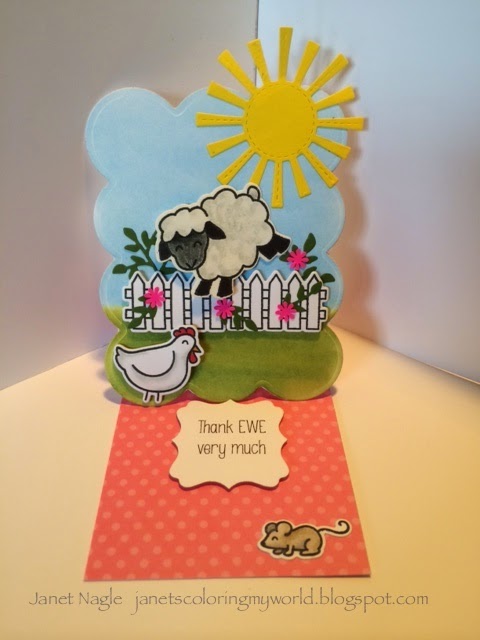
I'm still having fun with my Lawn Fawn Critters on the Farm stamps. Just when I go to put them away, I get another idea. I had already colored the little lamb and I thought how cute he'd be jumping over the fence...then I thought about vines and flowers on the fence and I had to make a card to see what it would look like! I made a small version of an easel card.
When I was looking for a link to the stamps, I found out that they are on sale at Markerpop.com, so if you NEED them...you could get on sale. The dies are on sale too, but they are out of stock right now :(
To make the lamb look more like he is jumping, I put a double piece of foam tape under his face and front legs, a single piece under his middle and glue dots under his tail and rear legs. I took a side view picture...not sure if you will be able to see it clearly enough but it gives the effect that I was looking for!
Here's a pic of the card open. I made the message on my computer. I found a cute font called "KG Somebody that I Used to Know". After I printed it out on card stock, I used a Spellbinder labels die to cut it out.
Thanks for stopping by. Have a good weekend!
Janet
Supplies Used:
Card Stock: Cougar Opaque white, Stampin' Up DSP
Stamps: Lawn Fawn: Critters on the Farm
Dies: Lawn Fawn: Critters on the Farm & Spring Showers,
CC Designs: Cutters Leafy Branch, Spellbinders: Labels 16
Copics: W-1, R27, YR24, Black
Prismacolor Pencils PC1063 Cool Grey 50%, PC1094 Sandbar Brown, Black
& Gamsol for blending
Miscellaneous: Pan Pastels: Phthalo Blue Tint, Bright Yellow Green Shade,
Perm. Green Shade; Small flower punch
When I was looking for a link to the stamps, I found out that they are on sale at Markerpop.com, so if you NEED them...you could get on sale. The dies are on sale too, but they are out of stock right now :(
To make the lamb look more like he is jumping, I put a double piece of foam tape under his face and front legs, a single piece under his middle and glue dots under his tail and rear legs. I took a side view picture...not sure if you will be able to see it clearly enough but it gives the effect that I was looking for!
Here's a pic of the card open. I made the message on my computer. I found a cute font called "KG Somebody that I Used to Know". After I printed it out on card stock, I used a Spellbinder labels die to cut it out.
Thanks for stopping by. Have a good weekend!
Janet
Supplies Used:
Card Stock: Cougar Opaque white, Stampin' Up DSP
Stamps: Lawn Fawn: Critters on the Farm
Dies: Lawn Fawn: Critters on the Farm & Spring Showers,
CC Designs: Cutters Leafy Branch, Spellbinders: Labels 16
Copics: W-1, R27, YR24, Black
Prismacolor Pencils PC1063 Cool Grey 50%, PC1094 Sandbar Brown, Black
& Gamsol for blending
Miscellaneous: Pan Pastels: Phthalo Blue Tint, Bright Yellow Green Shade,
Perm. Green Shade; Small flower punch
Labels:
CC Designs,
Critters on the Farm,
Lawn Fawn,
Spellbinders,
Thank You
Subscribe to:
Posts (Atom)