I've seen a lot of cards using normal images that were turned into something else by adding small details and then coloring in unexpected colors. They are such fun that I wanted to try one for my Halloween card! I used one of the cute little bunnies from the MFT stamp set called Somebunny. It was so much fun to zombify her! I inked the background with Distress Inks and splattered some water on it. I cut the moon using MFT circle STAX then stamped the spatters on it with Versamark Ink using MFT's Distress Patterns stamps. The tree is an edgelit die from Stampin' Up called Halloween Scenes. I'm not sure who makes the pumpkin and jack-o-lantern stamps. They were in my halloween stamp box but didn't have a name on them.
Here is a photo of the inside of the card...
I hope you enjoyed seeing my zombie bunny card! Thanks for visiting. Have a nice Halloween!
Janet
It's graduation time again and this year I had to make a card for my friend's brilliant daughter. She graduated with high honors from Georgia Tech and will be starting a job at Microsoft in Seattle!! She is also an outdoorsy girl who loves adventure! I don't have a lot of outdoor adventure themed stamps but I do have MFT's Up in the Air set and thought the hot air balloons would work for my card! I saw a card by Barbara Anders on the MFT blog using the balloons with a skyline and thought it would be perfect. Here is a link the card on Barbara's blog, she makes beautiful, inspiring cards!! I wanted to personalize the card so I looked on line for a clip art Seattle skyline, printed it out and then fussy cut it. Next I used MFT's new cloud stencil and radiating rays stencil to make the sky. I colored two sets of balloons using the colors of Microsoft's logo for the big ones and Georgia Tech colors for the small ones.
I didn't want the sentiment to block the sky so I stamped it onto acetate with black Staz-on ink. I used a fine line glue bottle to put tiny dots behind the letters and stuck it on. You can't see any glue at all!!
I thought I'd make the inside of the card look like the balloons had flown far, far above the city so I did a pop up card with lots and lots of clouds. I used the card stencil again with my Clarity brushes and Ballet Blue ink from Stampin' Up. I made a little pocket to hold my gift and stenciled it to match the clouds behind it.
Next I cut the post to hold the big balloon. I didn't like how it looked with the paper line showing so I snipped a piece out and replaced it with a strip of acetate, which looked better. I wanted the smaller balloons to pop out more than they would with foam tape so I took a strip of acetate 1 7/8" x 3/8" and scored it at 3/8", 3/4", 1 1/8" and 1 1/2". This allowed me to fold the strip into a box which I glued together to keep it's shape. The acetate box flattens when the card is folded but pops up a lot more than foam tape when the card is open. I like how the balloons make a shadow on the sky!!
To hide the pop up mechanisms, I used a cloud die. I'm sorry but I don't have it labeled so I'm not sure which company makes it. I found some that would work from Lawn Fawn and Taylored Expressions. The top line of the inside sentiment is from the Up in the Air stamp set and the Happy Graduation is from a Stampin' Up set called, Teeny Tiny Wishes.
Thanks so much for stopping by, I hope you like my graduation card :) Keep stamping!
Janet
I'll start out by saying that this is going to be a long post. A friend of mine played with alcohol inks and the polished stone technique on Yupo paper. Then she gave me 3 pieces and challenged me to come up with some cards using it. I was not familiar with Yupo paper, I wasn't even aware that she had used it when I accepted her challenge! The first piece made me think of water so I decided to make a card with the little Fun in the Sun girl from MFT (see my last post). I covered the polished stone with Versamark ink and then Amazing Glaze embossing powder but when I went to heat it, before the EP melted, the "paper" started to melt and curl, kind of like what happens with shrink plastic! I was really surprised and disappointed because I'd totally ruined one of the pieces my friend gave me.
I moved on to the 2nd piece which was beautiful. I stamped some script in black on it because I thought it would look cool. Here is a piece of it.

I thought it would be really pretty with flowers and the Joseph's coat technique. I used Stampin' Up's Garden in Bloom set and stamped the flowers with Versamark ink and detail clear embossing powder. This EP is much finer and melts quicker so I thought I could get away with it before the Yupo melted. I was very happy when it worked! The next step in this technique is to cover the entire thing with a dark color of ink. The idea is to cover up the background so the beautiful colors only show up beneath the embossed areas. I started rubbing a black ink pad over the piece and was pretty surprised that not only did the ink not stick to the paper but it completely rubbed off the alcohol ink that was on it!! It looked SOOO bad. I was disappointed again because I'd ruined the 2nd piece of polished stone from my friend. :( The flowers were unique and pretty so I cut them out and glued them onto a piece of dark gray card stock and added some leaves that were stamped on green dotted paper. I used some jewel circles that I got at a stamping convention and I was happy with the result.

Now I was down to the very last piece of polished stone from my friend! I was afraid to do anything except cut, die cut or punch it so that's what I did. I started by cutting out some grass. This is what the piece looked like...
This piece had fall colors so I immediately thought trees and leaves would be good. For the first card I used MFT's Trees in the Forest dies. I used MFT's Stiched Snow Drifts and dotted paper to make hills for my scene. I then cut a window in the top layer of my card using MFT's Jumbo Peek-a-Boo Circle Windows die. To finish the front of the card I added one of the little mice from the Harvest Mouse set by MFT and a little cardinal from the Cooler with You set.
Here is a close up of the trees. I wanted a plaid scarf so I added some lines with my Copics.
For the next card I use MFT'S Grassy Edges die and a leaf stamp and die from MFT's Fall Friends set. The scarecrow and crow are from the Fall Friends set as well. I used a circle die to cut an off center window in which to build my scene. I started by using Clarity brushes and Distress inks to color the background. Next I added the grass. I colored the scarecrow with Copics and used a brown Prismacolor pencil to add lines to his hat. I wanted the crow stamp to face left so I used waxed paper to get a reverse image and colored him with Copics, too.
To tie the window in with the rest of the card I added a branch from the I'm Tweet on You set (MFT). I wanted to use the polished stone leaves so I only cut out the branch and not the leaves. I attached the branch and leaves then finished the card by adding two different patterned papers and a sentiment.
For the final card I decided to cut the remaining polished stone piece into strips to use in making a mosaic type background. I also cut some coordinating patterned paper strips and solid strips. They are 1/4" and 3/8". Next I covered a piece of A2 card stock with double sided adhesive and stuck a strip diagonally across the sticky surface. I kept adding strips until the whole surface was covered. I really enjoy making these backgrounds. I had enough polished stone to make 2, one with using patterned paper and one using only solids.
Once the background was complete, I cut an oval and colored it using Distress Oxide inks and a sponge dauber. This ink blends like butter! Then I added a dark green frame cut with MFT's Stitched Oval Scallop Frames . The fox, crow, acorn and leaves come from the Fall Friends set (MFT). I stamped and cut 2 leaves from the remaining polished stone paper and colored everything else with Copics.
The fox looked a little flat so I stamped him again, colored his head and cut it out so I could pop it up. Adding leaves, the crow and the acorn around the frame finished the card off.
I found out one interesting thing when making this card. I added some Nuvo drops and as they dried, they pulled the color of the Distress Oxide inks into them. I only used 2 colors, Dandelion Yellow and Ripened Pumpkin, but if you look at the dots, there are more than 2 different colors! I'm going to see what happens when I put white drops onto the different colors of Oxide inks! Fun!!
Thank for taking the time to visit. Did you stamp today?
Janet
I have another tunnel card today, I'm really having fun with these! This one uses an MFT set called Polynesian Paradise. This set has the little hula girl and lots of animals and flowers to embellish a scene. I wanted to add some trees so I used my favorite, the palm tree, from MFT's Penguins in Paradise!
Like I did in my first tunnel card, I cut white card stock for an A2 size card and then added an extra panel by gluing on a 5.5" x 4.75" (scored at 4.25 and folded) onto one side. Next I used the MFT Oval STAX to cut holes in the top and second panel. I drew light pencil lines for the sky water and sand on all 3 panels so they would match then I did some masking and used my Clarity brushes and dye inks to color them. I used Stampin' Up Bashful Blue for the sky, Ranger Distress Tumbled Glass and Broken China for the water and Distress Antique Linen for the sand. I used a flat brush and floated a little white acrylic paint in the water for waves.

I added some sea grass to the middle panel using a Stampin' Up set called Wetlands. The next step was to color and cut out all the bits and pieces. I needed 5 palm trees, the Hula girl, some clouds, some flowers, a turtle, a pineapple and 2 lizards. To get the reverse image lizard, I stamped with MFT Black Licorice Hybrid Ink onto waxed paper and then quickly rubbed it onto white card stock. The image wasn't perfect but it was clear enough to trace with a fine tip Micron black pen. This pen doesn't smudge when you color over it with Copics. Once the images were colored I used Herma Dotto repositionable adhesive to place everything and make sure it would work when the card was closed.
When I was happy with the placement with the card open and closed, I glued everything into place. This card is really fun when you open it and bring the 2 side panels together to stand it up. It really does look like you are looking through a tunnel at a scene on the beach, and you get two views! One looking through the front side of the card...
and another looking through the second panel side!!
I hope you liked seeing this card and you give tunnel cards a try!
Thanks for visiting, happy stamping!
Janet
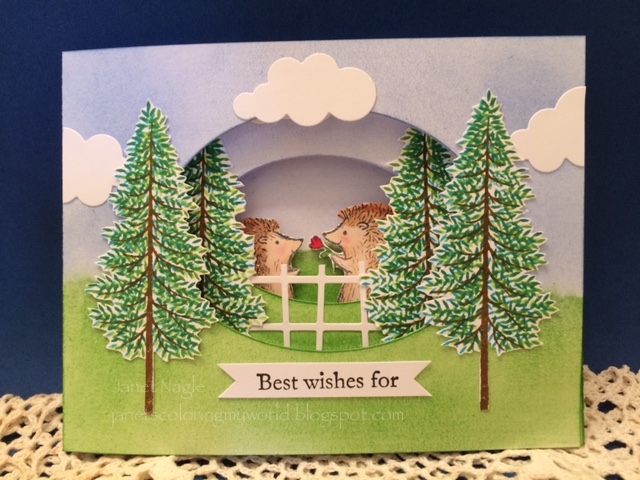
I've been seeing a lot of tunnel cards on Pinterest and blogs lately and wanted to try one. For this card I used the cute little hedgehogs from the Stampin' Up hostess set called Love You Lots and the tree from Thoughtful Branches. To start I added a flap onto an A2 card so I could have 3 panels. I used MFT Oval STAX to make windows in the top and middle panels. Next I used my Clarity brushes and die ink to add grass and sky to each panel.
I made 6 trees to add to the panels. I wanted the leaves on my trees to be nice and thick so I stamped them with 4 different colors. I used the Ranger Distress Inks: Mowed Lawn, Pine Needles, Mermaid Lagoon and Twisted Citron. For the top panel I added two trees on the edges of the oval cut out, some clouds and the first part of my birthday sentiment.
For the second panel I did the same but included a die cut fence and some little punched flowers with gems .
For the last inside panel I centered the little hedgehogs then added the trees, clouds, flowers and sentiment. Overall I was pleased with my first tunnel card. I know I will be making more of these!!
Thanks for stopping by, happy stamping!
Janet