Showing posts with label watercolor. Show all posts

Tuesday, August 14, 2018

MFT & Friends


Hi! I am super excited to be joining the design team for this month's MFT & Friends blog hop featuring the amazing August release!  There were so many fun stamps and dies in this release that I kind of went overboard with ideas and cards. I just couldn't help myself!  

For my first card I used the new Painted Poppies stamp set...so beautiful!  I used MFT reinkers and a few Ranger Distress reinkers to paint the poppies, leaves and background.  Reinkers are easy to paint with and I really like the vibrant color you can get when you use them for watercoloring.

The dies that I used to make this card are the Full of Heart Cover Up, the Single Stitch Line Tag Corner Rectangle STAX and Hearts in a Row - Vertical for the sentiment strip.  The sentiment is from the Aim for the Clouds sentiment set.
My second card features the new Birdie Brown Frightfully Sweet stamp set.  The little animals are so cute in their Halloween costumes and make such a cute shadow box! I used Copic markers to color the animals and then die cut them using the coordinating dies.  The MFT Home Sweet Home Die-namics, Trees in the Forest Die-namics and Grassy Hills Die-namics helped to complete the scene!!  I used the Inside & Out Stitched Circle STAX and the Linked Chain Circle Frame Die-namics to cut and embellish the circular window.  


When I was looking at the Take the Stage Die-namics I thought how cool it would be to use it to highlight a photo!!  Just think of the possibilities...an anniversary couple, a recital, a wedding, a birthday boy or girl...so many photos would work...and just imagine the recipient's surprise when they open the curtain and see their picture there!!  I added folds to the outer and inner curtain with Copic markers and added the sign which was cut using one of the A2 Rectangle STAX dies.  The sentiment and stars are part of the Friendship Rocks stamp set.  I used a favorite Halloween picture of my son for the star of my show!!


Here's how the card looks when you open the curtain...

I made a video of this card opening and closing but my computer is so old I had trouble getting it to download.  It looks strange so I hope it works.  In case it doesn't, I'll post the video on my Instagram account so you can see it in action at Bizzy32765.  I adore this card!!


I know, I made too many cards, but I have to share my last card, too.  For this one I used the Take the Stage Die-namics again with the Friendship Rocks stamp set.  The girls are so cute and fun to color.  The background was done with Distress Oxide Inks.  I have a friend who loves to sing...she is always singing to me...I can't wait to send her this card!


Thanks so much for stopping by.  I hope you enjoyed my cards!  Also a big thanks to My Favorite Things for inviting me to join in the fun today!!  Click here to get back to the MFT & Friends blog hop.  You'll find lots more inspiration there for using the fabulous August release!!

Make time to stamp every day, it's good for you!
Janet


Tuesday, April 17, 2018

Seaside Seagulls

I have a quick post for you today.  It's kind of a continuation of yesterday's post.  I made another master board using the same technique and materials except I used the Seaside Seagulls stamps from MFT!  They are so adorable and they made great guy cards!  


I stamped the seagulls using Momento Tuxedo Black ink randomly all over the watercolor sheet.  Then I used Copics to shade and color the seagulls and wooden perches.  I used Wilted Violet, Cracked Pistachio, Mermaid Lagoon and Salty Ocean Distress inks to watercolor the background.  For more details and specific sizes and products used, please see yesterday's post.  I put the Nuvo Jewel Drops all around the seagulls on this one!   

Here is a pic of the inside of my card!


Thanks for stopping by, try to stamp as often as you can.  It's good for you!

Janet

Roses For You

I like to have cards on hand to send when I need a quick thank you card or I hear someone is having a bad time.  I used the master board idea to make these.  Here are two of the thank you cards that came out of the effort.  I ended up getting 12 cards from one master board.


The process was pretty simple and I really liked the outcome.  I started out stamping the rose, leaves and little circles from Simon Says Stamp's Roses for You set all over a piece of 9 x12 sheet of white watercolor paper.   I used Canson 90 lb. watercolor paper from Micheal's,  Versafine ink and white embossing powder.  


Next I took out my Ranger Distress Inks and smooched them onto my craft mat.  I added a little water to each color to make them softer.  Then I put the color on randomly using a water brush.  The colors I used were Picked Raspberry, Abandoned Coral, Squeezed Lemonade, Cracked Pistachio and Evergreen Bough.  Once the background was finished, I painted in the roses and leaves using the same colors but didn't water them down as much so the colors would be more vibrant.  I added Festive Berries, Wild Honey and Mowed Lawn to the color palette to change the flowers/leaves up a bit. It didn't take a lot of time to do this and I found it very relaxing and fun!  Here is how the master board looked when it was finished.


Here is a close up, I avoided painting in the little circles so there would be pops of white throughout.


I then cut the master board into 12 pieces 2"x 4 1/2".  I cut a mat out of white card stock using the Stitched Mini Scallop Rectangular Stax from My Favorite Things.  I used my cutter to cut a 1 1/4 x 4" rectangular opening in the mat 5/8" from the right side and from the top. I stamped random sentiments in black and then attached the layers using foam tape.  To finish the card off I added little translucent drops using Nuvo Jewel Drops.  I like the way they catch the light.  


And here is the inside...  


I hope you like my cards today.  I have another version of the same design that I will share tomorrow.

Have a happy creative week!
Janet 


Tuesday, June 21, 2016

MFT Camp Create - Delightful Die Cutting


I was very grateful to MFT because their Camp Create helped me to come up with an idea for a sympathy card that I needed to make.  It was an especially difficult one because it was for the loss of a child and I had no clue what to make.  After watching Stephanie's video on partial die cutting, I had an idea and if it worked,  I knew what I was going to do.

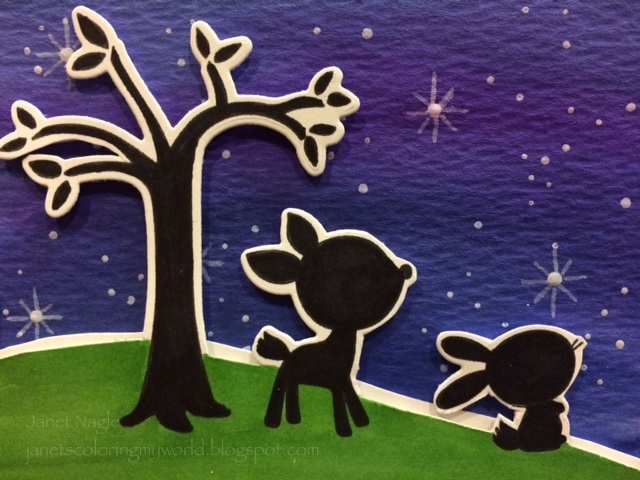
I used MFT's Sweet Forest Friends dies for the partial die cutting and then stamped the tree and the animals.  I used a black Sharpie to color them in so they would look like silhouettes against the sky.  I wasn't sure about the white edge but it looked like a moon glow around the objects so it worked really well.  Here is my card...


This is such a happy little stamp set, but in silhouette the animals worked very well to convey the tone that I was looking for.  

To make the sky, I used a piece of watercolor paper and reinkers.  The stars are made with white acrylic paint.  I used a small stylus and a toothpick to dot them on and then I painted the glow lines with a tiny round paintbrush.


I used a Hero Arts stamp and die set for the sentiment on the front of my card.  I die cut "prayers" out of black adhesive backed fun foam making sure that the adhesive would be on the front side of the word.  I removed the protective paper and then pressed some silver Deco Foil onto the adhesive.  When I lifted the foil sheet off, the foil had transferred and the word had a beautiful luster. The fun foam added a textural quality to the foil.  Here's a close-up so you can see for yourself. 


If you haven't watched any of the Camp Create videos, I think you would like them.  You can find them on the MFT Blog.  Just scroll down a bit and you will find them :)
Thanks for visiting!
Janet


Supplies Used:
Cardstock:  110# White Cougar Opaque, Strathmore Cold Press Watercolor Paper
Stamps: MFT Sweet Forest Friends, Hero Arts Prayers
Dies:  MFT Sweet Forest Friends
Copic: YR17
Vivid Reinkers: Ultramarine, Inky Blue, Purple, Orchid
Miscellaneous: Americana white acrylic paint, black Sharpie, clear Wink of Stella

Friday, April 29, 2016

Watercolor Painting with Coffee

My friend, Mary, told me about some portraits she'd seen that were painted with espresso!  She said they were striking and looked like sepia photos!!  She knows me and knew that I'd be challenged to give it a try!  Thanks, Mary!!  The most difficult part was brewing the coffee so I could get lots of different shades of brown to use.  I drink very weak coffee so the palest shade was easy.  The darker shades were much harder to achieve.  I felt like a mad scientist brewing espresso double strength multiple times, but that gave me the medium color, then I took some of that and added a few spoonfuls of instant coffee to get the darkest color.  Once I had the medium and dark color, I added some water to each to get shades in between.  Altogether I had 5 colors to paint with ranging from dark to light!

When I started painting, I was hooked!  The coffee behaved exactly like other watercolors and smelled delicious!!  I enjoyed it so much that I didn't want to stop so I have 3 cards to share with you.  On the first one, I used a flower from Tim Holtz Flower Garden stamp set.


After I finished painting with the coffee, I masked the flowers and added some interest to the background with stencils from My Favorite Things and Tim Holtz.  I used Distress ink and a blending tool for this.  The swirl at the top is from a Stampin' Up set called Baroque Motifs and the sentiment and "beautiful" die are from Concord & 9th.

I wanted to see how coffee painting would look on a more whimsical image, so I painted one of the cute little boy stamps from Lilli of the Valley.  I was very pleased with how it came out!  The browns fit perfectly with the old-timey look of the image!


For the extras on this card I used MFT's double stitched rectangle STAX and Picket Fence dies

On the last card I have to show you, I embossed Altenew's Persian Motif stamps with white embossing powder.  I was worried that the coffee might stain the white embossing, but it didn't.  I liked the simplicity of this card and thought it would make a good sympathy card.


The frame around the sentiment on this card is from MFT.  It is called Stitched Rectangle Scallop Frames and the sentiment is part of Hero Arts Prayers stamps and die set.

This was a really fun experiment.  I hope you enjoyed looking and that maybe you might give painting with coffee/espresso a try!  Thanks so much for visiting!

Janet 


Friday, April 1, 2016

Another Watercolor Background

Here's another card with a watercolor background.  I used reinkers for this one, too.  I do love them so when they come out good!  The frame is from Lea-bilities and is called Flower Frame.  Isn't it pretty?  It was a gift from a friend and I just love it.  I used white fun foam to pop it up and it worked great.  The Thanks is from Hero Arts.


Inside the frame I made a little scene with one of the cute little elephants from MFT's Adorable Elephants set and flowers from MFT's  Blissful Blooms set.  I've had both sets for a little while, but this is the first time I've used them. Here's a close-up 


Here's a an angled view so you can see the fun foam.  It works so well to pop up anything.  I'm addicted!


Thanks for visiting. If you have any thoughts or questions, please leave a comment.  Have a good weekend :)

Janet 

Monday, March 28, 2016

Watercolor Background

I've continued to work on my watercolor backgrounds and I'm liking my results more and more.  It's true what they say about practice!  I liked the results I got with my Peerless watercolors best but I found that I was using a lot of the pigment to make a pretty background.  So for this card, I tried using some reinkers and I was really happy with how it came out.  The colors are so bright...it makes you feel happier just looking at them!  I used a border die from Memorybox in white at the bottom of the card.  I couldn't find it on their website, but I found another one called Martingale border that would be just as pretty.  You can find it here.  Here is my card...


The Sending is a die from Simon Says Stamp.  It comes in a set with a Wishing die.  There are coordinating stamp sets too with lots of great words that go with the sending and the wishing!  The words I used are from the Wishing set.  Here is a close up that shows how the fun foam gives dimension to the delicate die. 


Sequins and a washi tape border strip finish things off!

Thanks so much for stopping by!

Janet 


Thursday, March 24, 2016

More Watercolor for Card Makers - Intermediate Techniques


I had some time to watch another lesson from this wonderful class and give it a try and I really enjoyed it!  In Lesson 2, Dawn taught us how to embrace the water and its unpredictability!  I used Peerless Watercolors and Canson Aquarelle watercolor paper for this one. Here is my version of the pear background that she taught in class...


As usual, one wasn't enough so I had to try some more.  I was thinking about Easter and Peeps and tried the technique using Peeps for my background design.  I tried using multiple colors but didn't like multi-colored peeps so I gave up and didn't go too crazy with color on this one. I used Koi Watercolors and Strathmore watercolor paper.  I used fun foam to pop up the letters.  They are from MFT and I thought the tiny holes in the letters wouldn't work with the fun foam, but they did and perfectly!  Here is the card...


Since I had everything out on my table and I had the time, I just kept playing and made another background with butterflies.  I drew the butterfly and I'm not really too happy with it, but I do like how the water and the paints blended together for this one!  


Thanks for visiting, hope you stop by again soon :)
Janet

Saturday, February 6, 2016

Watercolor for Cardmakers - Intermediate Techniques

I rarely win anything but this was my lucky week, I won a spot in the latest Watercolor for Cardmakers class.  It goes into depth on intermediate techniques!  

Special thanks to Debby Hughes for offering a chance to win!!  She is the owner of Lime Doodle Design blog and does gorgeous work.  If you have a few minutes, you should go and visit...her posts will definitely inspire you and make you want to stamp!

The class is given by Dawn Woleslagle (of WPlus9).  She is a fabulous teacher and gives a lot of explanation about how the water and paint react to each other when you do watercolor.  She even explains what a bloom is and how how to avoid it.  I've made lots of those and I don't like them, so I'm really happy to know how to avoid them.  

It was a busy week for me so I only got to try one of the lessons.  It was on brush techniques and using your brush to help you make shapes.  I tried the coneflower lesson given by Yona Smakula.  It was amazingly easy and fun...so much fun that I tried it with 2 different colors!  I  used Strathmore cold press watercolor paper and Koi watercolors.  Here are my two practice sheets.  Using shades of purple...


And shades of red.  I added some leaves to this one and I like it better with more green...


Here are the cards I made using them.  I cut the Hello from black paper and black fun foam and glued them together.  Love the dimension it adds!!  I wish I'd added the strip at the bottom of this card before I die cut.  I think it would have looked better with the scalloped edge but I used my good glue so there was no way I could get it off! 


I used MFT Blueprints Tagbuilder 2 to make the tag for this card.  It was the perfect size and I really like the little scalloped edge on the bottom!  The sentiment is from Stampin' Up.


If you want to learn more about watercoloring, this class is great!
Thanks so much for visiting.  
Janet