Showing posts with label fun fold. Show all posts

Sunday, May 1, 2016

Graduation Pull Up Card

Here is the graduation card that I made for my niece.  She is graduating from UMass Lowell's School of Nursing and we are very proud of her accomplishments!  I am not sure about the name of this kind of card, but I saw it somewhere and made a template so I used that.  Sorry that I don't have a link for you.  When you open the flap at the top of the card, the sentiment part of the card pulls up to reveal what it says.  Black and blue are her school colors so I used them for this card.  Here is how the card looks before opening...


The stamps are from Art Impressions.  I've used them so many times!  The graduation cap and sentiment were too big for the space so I stamped them together and then resized them  on the printer.  This is how the card looks opened...


When you open the flap, a little "for you" folder appears where you can tuck a gift card or a check!!  The little pixie stamp is from Memory Box.  I colored her with Copics and paper pieced her dress and hood.  She is holding a magic wand that is star shaped, but I put a little school logo to make it more personal.  Here's a close up...


The sentiment inside the card was made on my computer.  As you lift the flap, the message part of the card moves up with it.  Here is a side view so you can see how the moving part of the card works


If you know the name of this kind of card,I'd really appreciate it if you would leave a comment telling me what it is.  Thanks for stopping by.  

Janet 

Sunday, January 24, 2016

Twist Fold Card

This is a new card shape for me.  It is called a Twist Fold Card.  You start out with a piece of card stock cut to 4 1/4 x 11.  Thinner card stock works better for the base card.  Score the card diagonally from corner to corner and fold on the score line.  Then fold the piece in half and decorate.  If you google "twist fold card" there are lots of samples and tutorials!  I used a stamp and die set from Taylored Expressions called Paw-some!


Here is what the inside of the card looks like.  I sent this card to my niece and I knew it was going to arrive a little late so I changed the "is" to "was"!


Thanks so much for stopping by!
Janet

Tuesday, February 3, 2015

Magic Marquee Birthday Card

Magic Marquee cards are fun.  When you have one in your hands you can't stop yourself from playing with it!  The little animal stamps from Purple Onion are perfect for this kind of card because little images work so great with them.  I love the owls so I decided to use them  for this birthday card!  Here is the front of my card...


I learned how to make this card from a video by Jan Tinklenberg.  You can find it here.    Here's a look at the inside of the card...


A close up of the owl on the front of the card!


And of the little owl!


I made a video so you could see this card in action. 


I know it's a pretty lame video, but at least you can see what happens when you open a Magic Marquee card!  
Thanks so much for looking!
Janet

Supplies used for this card:
Card Stock: Doodlebug: Sugar Shoppe, SU Taken with Teal, Cougar Opaque
Stamps: Purple Onion: Ruby and Shadow
Copics:  


Thursday, March 13, 2014

Card in a Box Bouquet

I've seen so many of the cards in a box on Pinterest lately that I was itching to try one.  I looked at lots of tutorials and found that there were quite a few different measurements that I could use. I made a sample that would fit in an A2 envelope but it was too small because I wanted to use Stampin' Up's Flower Shop stamps.  I found another tutorial but the measurements were in centimeters and I couldn't figure out the conversion, so I took a piece of 8-1/2 x 11 card stock and figured it out!  I'll put the measurements I used at the bottom of this post in case you are having the same problem that I had.  Here is how my card came out!


And here is a side view.  There are lots of tutorials for assembling this kind of card on line.  Just do a search and you will find one.


The really amazing thing about this kind of card is that it folds flat and can go into the mail!  It has real WOW potential!  I know I will be making lots more of these!


Here are the measurements I used

Fits in envelope that is 5-3/4" x 8-3/4"

Cut card stock 10-1/2" x 8"

With 10-1/2" side up at top of score board….Score at 2-1/2, 5, 7-1/2 and 10

Turn so 8" side is up at top of score board….Score at 4

Cut extra piece of same color 3-1/2" x 3-1/2"  ….Score this piece at 1/2 and 3 and cut in half (1-3/4)


Measurements for mats

For back of box 
Large mat is 7-3/4" x 2-1/4" ……smaller mat 7-1/2" x 2"

For flaps and bottom

Large mat is 3-3/4" x 2-1/4"…..  smaller mat is 3-1/2" x 2"

Supplies Used:
Stamps: Stampin' Up Flower Shop
Cardstock: Stampin' Up Whisper White, Soft Suede, Old Olive, Pretty in Pink, Taken with Teal, DSP 
Inks: Stampin' Up Cool Caribbean, Pretty in Pink, So Saffron, Taken with Teal
Dies :  My Favorite Things Royal Leaves

Miscellaneous: Stampin' Up Pansy Punch, 1-1/4 Circle Punch, 1-3/8 Circle Punch, Scalloped Circle Punch,  Art Institute Glitter

Tuesday, February 11, 2014

Kind & Cozy

I had to make a challenge card for a small local group that I'm a member of.  They post 2 challenges at a time and you get to pick which one you want to do.  This time it was "make a card using sequins or Flower Soft"  and a Fusion sketch, where you had to use the card sketch, the theme or the color combo!  I decided to combine the 2 challenges into one card and this is what I came up with…


It's a variation on the sketch, but I think it works!  I just got the Kind & Cozy set from Stampin' Up so I had to use that and I saw a great video tutorial on this fun fold by France Martin.  You can see it here if you want to try making one!  You should watch the video anyway because she has such a cute accent and way of saying things!  It makes me smile every time I watch it :)  The card is a tri-fold and doesn't stand up well on it's own so I added an easel to the back of it using Sizzix Bigz Easel Die by Tim Holtz. Here is what the card looks like when you open the first fold…


…and the 2nd fold…


And here is a picture of the Fusion Card Sketch that I used.  I think it's a fun take on card sketches.  Here's a link where you can find more…www.fusioncardchallenge.blogspot.com.  I love that they post lots and lots of sample cards for you to see!


Thanks for visiting!  Hope you have a good week :)
Janet

Supplies Used:
Stamps: Stampin' Up Kind & Cozy
Inks:  Stampin' Up markers
Dies : Spellbinders Circle and Scalloped Circle dies
Miscellaneous: sequins, washi tape

Monday, December 9, 2013

Magic Slider Card - Get Well

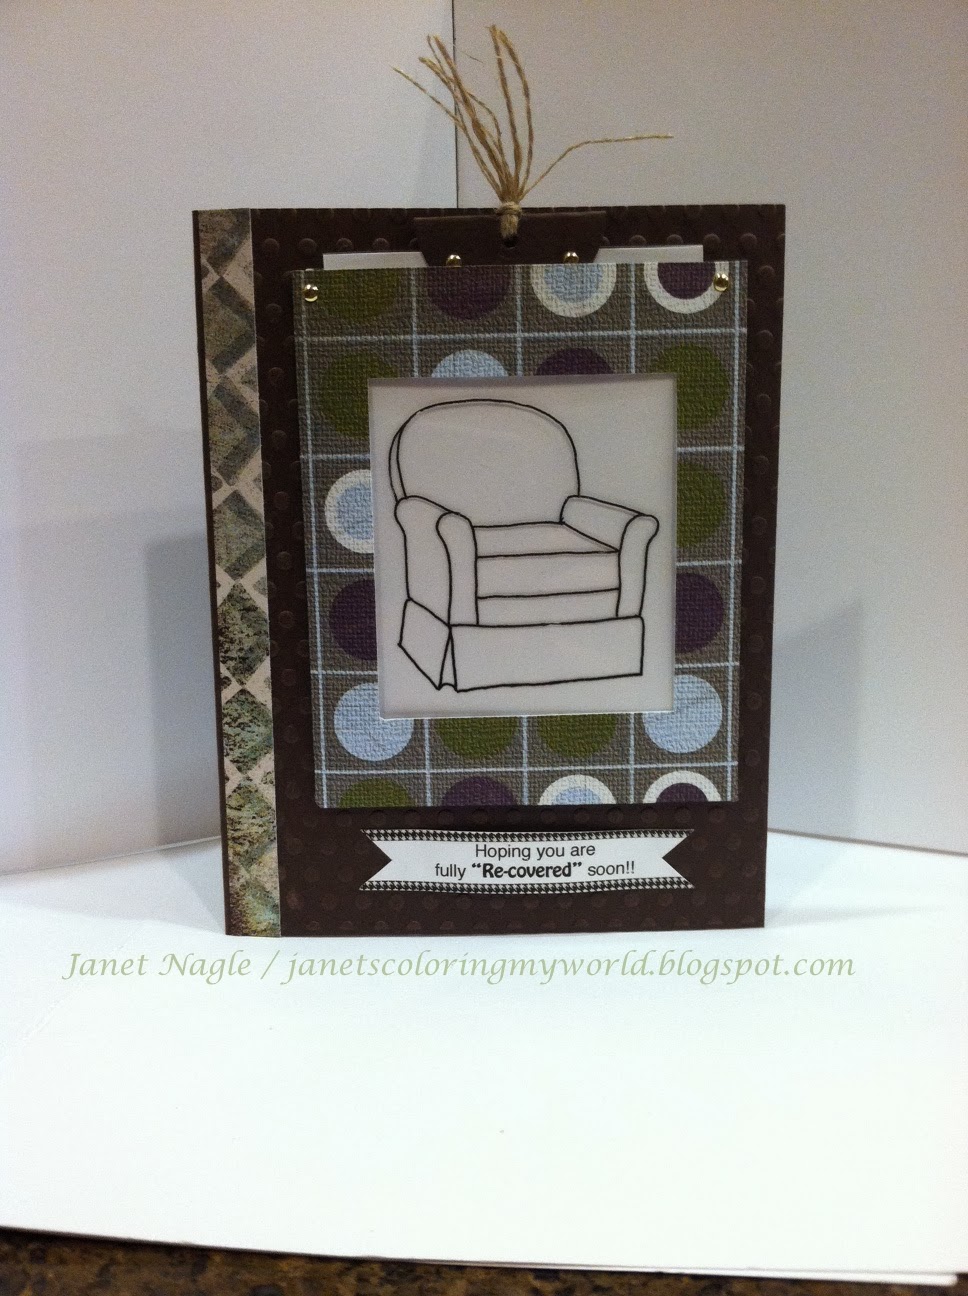
I did it!  I finally tried making a magic slider card...and it was FUN!!  It wasn't nearly as difficult as I had imagined.  I don't know why I put off making one for so long!  I was inspired by a card I found on Pinterest made by Amy Wanford.  You can see it here!  Isn't it great...just perfect for someone who is coming back from surgery.  Problem is, I didn't have an upholstered chair stamp so I ended up finding some clip art and using my light box to trace it, then had to trace it again on acetate.  Let me tell you, it was a pain so if you want to try making this card, I'd recommend finding a chair stamp.  It will make your life SOOO much easier!  Here is how my card looks closed...


As you start pulling on the the tag...


And completely opened...


From now on I will put a little tag on top saying, "Pull" because the recipient of this card didn't realize it was magic until his Mom (my stamping friend, Kathy) told him to pull it!!

I do better at video directions than written ones so here is a link to the YouTube video that I used to help me make this card.  I sized down the measurements so the little pocket would fit on the front of a standard sized card.  l found another tutorial by Beate from Splitcoaststampers, here.  It's so good I thought you might like to take a look at this one, too!

Thanks for visiting!
Janet

Sunday, December 8, 2013

Angel Gabriel - LOTV

I just love shadow box cards.  I don't know for sure what it is that I like about them but they make me happy.  The Angel Gabriel stamp from Lilli of the Valley reminded me of Nativity plays and since shadow box cards look kind of like a stage, they were a perfect match!


I used Copics to color the image and then cut the pieces for the shadow box.  You can view a Splitcoaststampers video tutorial by Dawn Griffith here.  I wanted to give my "stage" a primary school feeling and I thought the star border from My Favorite Things was perfect!  I finished the card off with a little clear glitter and a computer generated sentiment.  Here's a close up of the inside of the card...


I also put a sentiment on the back of the card since this kind of card doesn't have an inside!


I hope this gave you some ideas or inspired you to make a shadow box card!  Thanks for stopping by.  

Janet