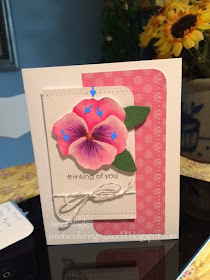
Hello, my post today is a card that I made a while ago. It combines two things that I love, card making and Tole Painting. Before I became a card maker, I spent my free time painting on wood. I learned how to float color with a flat brush to add shadows and highlights. I was pleased when I tried the same techniques on paper and found that it worked just as well!! For this card, I used a pansy stamp from Stacy Stamps. Scroll down on this page and you will find it. It is sold with a pansy corner stamp. The flower is painted with Americana acrylic paint. You can get it at Micheal's. The finished effect has a matte, chalk like finish. Here is my card.
If you've done Tole Painting, this will be easy for you to understand but I'll try to explain it so that even those of you who have never done it might be able to give it a try. First stamp the flower in a light color a little darker than the color you've decided to paint the flower. Next base coat the flower by wetting your brush and then picking up some paint. The water will help the paint to flow over the card stock and will make it a bit more transparent so the stamped lines will show through. Next put in the shadows. You will need a flat brush, I used a 10 flat. Side load the brush with a darker pink. You can see how to side load your brush and how to float the paint here. You will need to put shadows behind the two middle petals and then on both sides of the petal that lays on top of them. I also put a little shadow on the outside edge of the petal that is behind all the others. The arrows in the picture below show where the shadows go.
Next you do the same thing with white paint to add the highlights. Side load your flat brush with white and float highlights on the top edges of the middle two petals and all around the petal that lays on top of the others.
After the shading and highlighting are completed and dried, take some purple paint and add water to it until you get an inky consistency. Use a liner brush to make the thin lines that form the colorful center of the pansy. The final step is to paint in the center of the flower with a butterscotch color and float on a little brown to make it look rounded. Here is a close-up of the flower.
This technique is a lot quicker than you would think and it is really pretty when it's done. I've used lots of colors and they all look great!
Thanks for visiting,
Janet
Saturday, May 21, 2016
Sunday, May 1, 2016
Graduation Pull Up Card
Here is the graduation card that I made for my niece. She is graduating from UMass Lowell's School of Nursing and we are very proud of her accomplishments! I am not sure about the name of this kind of card, but I saw it somewhere and made a template so I used that. Sorry that I don't have a link for you. When you open the flap at the top of the card, the sentiment part of the card pulls up to reveal what it says. Black and blue are her school colors so I used them for this card. Here is how the card looks before opening...
The stamps are from Art Impressions. I've used them so many times! The graduation cap and sentiment were too big for the space so I stamped them together and then resized them on the printer. This is how the card looks opened...
When you open the flap, a little "for you" folder appears where you can tuck a gift card or a check!! The little pixie stamp is from Memory Box. I colored her with Copics and paper pieced her dress and hood. She is holding a magic wand that is star shaped, but I put a little school logo to make it more personal. Here's a close up...
The sentiment inside the card was made on my computer. As you lift the flap, the message part of the card moves up with it. Here is a side view so you can see how the moving part of the card works
If you know the name of this kind of card,I'd really appreciate it if you would leave a comment telling me what it is. Thanks for stopping by.
Janet


